(704) 568-8841

STAY IN TOUCH

Follow us on TwitterFollow us on FacebookFollow us on FlickrFollow us on Pinterest

Instagram

We are active on TwitterFacebook, and Flickr with gardening tips, news, and updates. Follow us and stay in touch.

Here are some photos from our Flickr account.

Search

FREE NEWSLETTER!

Get important updates, tips & tricks on edible organic gardening, micro-farming and more. 

If you aren't one for filling out forms, fret not!

You can call us at
(704) 568-8841

Or you can send us an email
hello@microfarmgardens.com

If you want to hire us for your project, need a quote, or if you have a few questions,
fill out the following and click submit. We'd love to help. 

Friday
Jan182019

Local Pros Share Tips for Starting Seeds Indoors 

Every grower dreams of watching tiny seeds sprout and grow up to be sturdy, compact seedlings - the kind with that unmistakable vigor, that are eager to brave blustery spring days outside in the garden.

But often starting seeds at home can be, well… iffy, and results often fall short of the robust seedlings your local nursery has for sale. Just follow these tips from local experts, and you’ll be well on your way to starting seeds like a pro.


Supplement Sunlight with Llorescent Lighting

Often, a sunny window inside your house will have just enough warmth and light to germinate and sprout seeds, but not enough direct sunlight to grow the kind of compact, robust seedlings. In fact, window sill-seedlings frequently turn out to be anemic looking, spindly sprouts, worn thin from chasing disappearing sunlight. The solution is supplemental florescent lighting.

“Newly sprouted seedlings will benefit from up to 18 hours of direct light,” explains Alan Corder, owner of American Beauty Garden Center. “Most people sow seeds indoors during winter for a spring garden, but the days are still too short.” Broad-spectrum florescent lights are very well suited to starting seeds indoors because they produce a tremendous amount of light lumens compared to the amount of electricity used.

Florescent lights bulbs also emit very little heat compared to other types of artificial lighting, which means you can place the light just a few inches above the surface of the soil or the plastic dome covering the tray, and not scald the seedlings. In fact, placing the light just a few inches above the tiny sprouts as soon as they pop up, is key to achieving compact, stocky growth. Use a plug-in timer to control the grow light, and remember to mount your light on an adjustable chain or pulley system so it can be easily raised as your seedlings grow. 


Maintain Ideal Soil Temperature

“Remember that seed germination is triggered by temperature, not light,” says Nick Waddell, co-owner of Rountree Plantation Nursery. “That means that, even with supplemental lighting, if your grow area is set up in a greenhouse, garage, or another cold environment, you’ll need to place a heat mat underneath the seedling tray to keep the soil warm.” Between 75-80 degrees works well for germinating most varieties, and seedling heat mats can be controlled with a thermostat. 


Keep soil evenly moist

“Always start seeds in a light, sterile growing medium designed specifically for seed starting and propagation,” Nick continues. “ Wet the soil before planting, aiming for a consistency that’s moist but not waterlogged - about like the dampness of a wrung out sponge.” Seeds can rot in soggy soil, of simply fail to germinate in soil that’s too dry. Nursery trays with drainage holes are the way to go, and versions with many small individual capsules are ideal for the home gardener because the entire garden can usually be seeded in just one or two trays.


And with supplemental lighting above your seedlings and a heat mat underneath, it’s likely that the soil will begin to dry out before the seeds have sprouted and are ready to transplant. So be sure to check your seedlings daily, wetting the the soil as needed with a spray bottle, to keep it evenly moist. Placing a clear plastic dome over your seedling tray helps retain moisture, but it’s still just as important to check the soil frequently, adding water as needed.


Preparation & Timing

“Some varieties just don’t transplant well, and are best seeded directly into your garden,” adds Nick Waddell. “Root crops like carrots, parsnips, and radishes, for example. Also, take careful note of the germination period of each seed variety you have, and time your sowings accordingly. Sow varieties with a germination time of weeks - like peppers - well ahead of ones that can pop up in as little as a few days, like squash, cucumbers or beans.”

“We’ve found it beneficial to pre-soak seeds in an organic B-1 solution like Thrive Alive, before planting,” adds Alan Corder. “Beans should always be treated with inoculant, and certain seeds will germinate better when gently scored with a knife before sowing.”


Wednesday
Jan162019

Relax, It's Matt Rocco's Organic Garden

Matt Rocco has a career where long hours and high stress come standard, every day. But lately the effects of working in this boiler room type environment had become so acute that making the transition from work to home was proving more difficult. So to make it easier for Matt to unwind at home, his wife, Lindsay,  surprised him with an organic garden.  

We selected a sunny corner on the south-facing side of the family’s Eastover home, just behind a brick wall. The garden sits right beside a pathway with easy access to the front and back yards, and a water spigot is conveniently just a few feet away. The ornamental bench opposite the raised bed gives Matt a place to relax and enjoy the garden. 

We chose a 4’x8’ Kitchen Garden raised bed because it delivered the perfect balance between grow area, and adequate space to move around and access every part of the garden. The garden bed’s 4’ width allows a user to reach the center from either side, without having to step on the soil.

Our Kitchen Garden raised bed design is made with locally milled, eastern red cedar which is naturally resistant to decay and damage from insects. The rustic texture, aromatic scent, and color variety between boards, give this hand-cut lumber a special beauty that store-bought lumber just doesn’t have.

Of course it takes more than an organic garden to loosen up, and the Rocco family treasures their summer vacations. So to make sure Matt’s garden stays watered when it needs it the most, we installed a Netafim 1/2” drip irrigation system that’s controlled by a battery powered timer placed at the nearby spigot. Now he can simply program the timer, then hit the road for some much needed down time with the family.

One of the best advantages of the The Kitchen Garden design is the 18” height which makes gardening much more comfortable than bending over to reach plants in the ground, or in shallow raised beds. Plus it helps keep out rabbits, too.  And with a sturdy seating cap placed around the top edge, you can actually sit and garden at the same time. Now that’s relaxing!

We always fill our raised beds  with an OMRI listed blend of pine bark fines, expanded slate pebbles, and mushroom compost, which will never harden or become compacted over time. This ‘soilless’ growing medium strikes the perfect balance of drainage, aeration, and nutrient retention for healthy roots, and vigorous plants. And a generous helping of Espoma’s iconic Plant-Tone organic nutrient blend adds the essential nitrogen, phosphorous, potassium and trace minerals that will ensure Matt’s garden thrives all season long.

You’re probably thinking, “Well, that all sounds great, but has the garden actually helped Matt leave the stress back at the office, and get more enjoyment out of time at home?” 

“Absolutely”, says Lindsay. “He’s outside tending the garden all the time now, and he’s waaay more relaxed.”


Thursday
Jan102019

The History of Rainwater Harvesting


When you consider the range of high tech rain harvesting equipment available today - from specialty diverters that remove debris from the water before it reaches the tank, to the high strength resin tanks that can hold hundreds or thousands of gallons, to powerful electric pumps that put the water right where we need it - it’s tempting to think of rain harvesting as something new. But in fact, capturing and storing rainwater in cisterns goes back thousands of years - to the neolithic age, when waterproof lime plaster cisterns were built into the floors of homes in Southeast Asia. 


By 4000 bce, rainwater storage tanks were a crucial component of the emerging water management techniques used in dry-land farming.

Ancient cisterns have been discovered in Israel, including one dating to around 2500 bce with a storage capacity of 60,000 cubic feet. It had been carved from solid rock, and lined with large stones sealed with clay to ensure it stayed watertight.


During the Minoan period (2,600 - 1,100 bce) large cisterns were used on the island of Crete to collect and store rainwater, including one at Myrtos-Pyrgos dating from 1700 bce, with a capacity of over 2,400 cubic feet. 


Around 300 bce, farming communities in what is now Pakistan, Afghanistan, Iran, and India harvested rainwater for agriculture and other uses. Notable collection tanks in this region include the Shivaganga tank, which collected rainwater from the Brihadeeswarar temple in Indai, and the Vīrānam tank, which was 16 km long and had a capacity of 1,465,000,000 cubic feet.

Romans excelled in rainwater harvesting and built entire cities with the infrastructure to divert rainwater into large cisterns to be used for drinking, bathing, washing, irrigation, and livestock. In Pompeii, rooftop water storage cisterns were commonly used before construction of the aqueducts in the first century bce, and for centuries, Venice depended on rainwater harvesting, because the lagoon that surrounds the town is brackish and undrinkable.


The ancient residents of Venice built insulated collection wells that allowed water to percolate down specially designed stone flooring where it was filtered by a layer of sand, then collected at the bottom of the cistern. Later Venice imported water by boat from nearby rivers, but these storage tanks were vital for times when the city was under siege by an enemy and cut off from the mainland. 

The enormous Sunken Palace cistern, in modern day Istanbul, was made to capture rainwater from the streets above, and still exists today. It’s so large that boats can sail in it.

In the 16th century, the terms ‘soft’ and ‘hard’ water were coined by early settlers of North America, who began to use rainwater for laundry instead of mineral-rich ‘hard’ water. When they washed with ‘hard’ water, the soap would react, causing a build-up to occur, unlike when they used soft rainwater, The harvested rainwater allowed the soap and dirt to wash off much more easily than the hard water, which reacted with the soap, causing build-up.

In fact rainwater harvesting was so important in certain frontier areas, that both settlers and natives would not have been able to survive without it.


Thursday
Jan102019

How to Use the AHS Heat Zone Map


Most growers’s have some notion of the cold hardiness zones and what they mean. Thanks to cold hardiness zone map, for example, we know that a tropical variety that might survive winter Tampa won’t stand a chance in West Virginia.  But have you ever considered how much heat a plant variety can tolerate before deciding to grow it? 

While extreme cold can kill a plant overnight, death from extreme heat is gradual and can take much longer - sometimes years. Signs of heat damage can appear in various parts of the plant ; buds wither up, leaves fade to brown or white as their chlorophyll drains away, and leaves shrivel and become the target of insect attacks. A plant stunted from heat damage may even survive in a chlorotic state for several years, but when atrophy reaches a certain point, growth enzymes are deactivated and the plant dies.

Use the Heat Zone Map the same way you use the Cold Hardiness Map : locate the zone you live in and use that number code when selecting plants. The the map’s twelve zones show the average number of days each year that a region experiences temperatures over 86 degrees - called ‘Heat Days’. This is the temperature at which plants begin to suffer damage from heat. The zones range from Zone 1 (less than one heat day) to Zone 12 (more than 210 heat days).

Many plant varieties have now been coded for heat tolerance - the same way they’ve been assigned a cold hardiness zone that indicates tolerance for cold. Eventually the heat zone designations will be paired with cold hardiness zone designations in garden catalogs, nurseries, and reference books. The first two of the four numbers assigned to each plant variety indicate the cold hardiness zone, while the last two indicate the heat zone. So for example, a plant listed as 3-9, 8-2 could be safely planted outdoors year round in zone 7. 

Just remember that the heat zone ratings assume that a plant’s roots have received an adequate supply of water, and even a short period of drought can distort the accuracy of the coding system. Certainly some varieties are more drought resistant than others, no plant can survive becoming completely dehydrated. Herbaceous plants are about 85% water and woody plants are about 50% water, and it’s essential that plant tissues contain enough water to carry out photosynthesis. 

Thursday
Jan102019

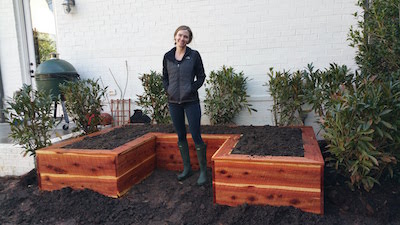
Juliette Lane's U-Shaped Kitchen Garden

Juliette Lane’s new home adds grace and charm to an already beautiful Myers Park street, lined with towering oak trees. It’s apparent that every detail on the property was carefully considered, from the very placement of the home and its color palette, to the careful design and arrangement of landscape plantings. And while an organic garden may not have been in the original landscape design drawing, with the simple relocation of a few shrubs, we opened up a level, south-facing area right beside the detached garage. In fact it was a perfect location for a organic garden ; lots of sun, close to the kitchen and just a few feet away from a water supply. Plus the white painted brick wall behind the garden will absorb heat during the day and radiate it back onto the plants on cold nights, creating a ‘microclimate’ that can warm the air around the plants several degrees.  

To maximize growing space within the area, we built Juliette’s Kitchen Garden in a U-shape - 3’ wide, 9’ across the back and 6’ on each side. The garden is 18” tall - the typical height of a chair seat or bench. This makes gardening much more comfortable, and also helps keep out rabbits.

Our Kitchen Garden design is made with rough sawn red cedar, which shows the rugged, unique texture of hand milled lumber. Untreated red cedar is naturally resistant to deterioration from moisture and insects, which makes it the ideal choice for outdoor projects involving cultivation, like raised beds, chicken coops, compost bins and greenhouses. 

We filled the garden with an OMRI listed soil blend of pine bark fines, mushroom compost and Sta-Lite PermaTill. These small pieces of slate have been heated and expanded in a kiln, and they help increase soil quality in raised beds by improving drainage and aeration. Once the garden is completely filled with soil, we mix in a generous amount of Espoma Plant-Tone - the gold standard of organic amendments for many years.