(704) 568-8841

STAY IN TOUCH

Follow us on TwitterFollow us on FacebookFollow us on FlickrFollow us on Pinterest

Instagram

We are active on TwitterFacebook, and Flickr with gardening tips, news, and updates. Follow us and stay in touch.

Here are some photos from our Flickr account.

Search

FREE NEWSLETTER!

Get important updates, tips & tricks on edible organic gardening, micro-farming and more. 

If you aren't one for filling out forms, fret not!

You can call us at
(704) 568-8841

Or you can send us an email
hello@microfarmgardens.com

If you want to hire us for your project, need a quote, or if you have a few questions,
fill out the following and click submit. We'd love to help. 

Fill out my online form.

Tuesday
Dec042012

Hen House With a View : The Combs Family's Lakefront Coop

The Combs family loves their chickens.  If you add up all the hens, roosters, pullets and cockerels there are well over a dozen of them scratching, pecking, and crowing around a large kids playhouse which has recently been moonlighting as a chicken coop.

“I thought we could build a separate coop area here”, smiles Susanne, pointing underneath the playhouse’s back deck. “ The coop area that we already have on the other side is starting to get a little crowded.”

The area underneath the deck measured about 6’x8’x 5’ high, and the existing framework was well suited for a coop for up to eight chickens.  The lakefront view wasn’t bad either

The first step was to determine the best location for the roost box and the human entry door, as these decisions have a huge impact on comfort of the birds, and ease of entering the coop for cleaning, feeding, etc. We went with an outward opening door at the lakeside corner of the deck, and built a roost box that ran along the opposite end of the deck.

The family had requested a window to give the chickens more sunlight, and the 18”x24” roost box window in that location will let hours of morning sunlight into the coop.

Once the layout was determined, the framework was installed. The budget for this project didn’t allow for cedar, but instead of using pressure treated pine, which isn’t a good choice for chicken coop construction because of possible health risks, we used untreated pine framing lumber, and applied Timber Pro’s Non Toxic Internal Wood Stabilizer, which safely seals the wood and gives it about the same lifespan as pressure treated pine.

We chose to make the roost box wall panels using ½” thick T1-11 siding with deep grooves on 4” centers. The walls were painted to match the existing color on the playhouse siding, and a door was framed and mounted.  We used galvanized roofing material placed at an angle between two of the deck’s floor joists to keep the roost box dry, and funnel rain water outside the coop where it can run down to the lake.

Because they have had issues with large predators like coyotes before, we wrapped the coop with ½” galvanized hardware cloth, which is much sturdier than hexagonal poultry netting.  To thwart any attempts by digging predators, we placed a skirt around the base of the coop, buried to a depth of about 8” and anchored underground with a layer of concrete.

Once finishing touches like the ladder, window, and egg door were finally in place, the Combs’ flock didn’t waste any time getting settled into their new home. With the rascally young cockerels pecking at our ankles, and crowing like horns in a traffic jam, it was time to skedaddle.   

Maybe all that crowing was a persistent suggestion to pack up out gear and leave them alone with their hens, or maybe it was just lots of thanks for their comfortable new home. Whatever the case, the chickens sure seemed happy in their new coop and they’ve got one heck of a lakefront view.

Thursday
Nov082012

High Capacity Wooden Compost System Swallows Cute Plastic Composter

It’s the time of year again when plastic bags overstuffed with leaves start piling up in front of houses like sandbags around a bunker. Which is a shame, because even if you never grew a vegetable for the rest of your life, you could still convert  those leaves along with your coffee grinds, orange peels, and egg shells into a yard of the month award. 

Seriously, all that stuff can be used to make compost, which can improve the health of any plant on your property, even your lawn.  Don’t know how to make compost? Click here

Don’t know what a high capacity compost station is? Read on.

While the curiously expensive plastic composters hawked by garden catalogs are great for breaking down a few tablespoons of coffee grounds and a half a bag of grass clippings, the typical suburban homeowner will find herself with piles of other yard trash with no place to go. That’s why we suggest higher capacity, multiple compartment compost stations made out of wood, that can receive and process a more realistic amount of organic waste.

Because air exchange is crucial for the initial part of the decomposition process, a design with good ventilation is key.  Shipping pallets are great for building multi bin compost stations this because the spaces between the wood slats offer ready -made ventilation , and for the most part, pallets are simple to connect.  

We’ve made lots of pallet compost stations, some with a galvanized metal lid, and some without. Why the lid? Compost geeks out there can tell you that the anaerobic bacteria that complete the second part of the decomposition process can be killed if the compost heap becomes too wet ( i.e. gets flooded in a continuous rain ) Will the stuff not break down because the anaerobic bacteria drowned? No, of course not, it’ll just take longer.

Imagine you’ve got your compost skills dialed in, and your pile is steaming like a locomotive, and maxed out at a hand scalding 158 degrees. You’re taking pictures with your phone, and everything, when a rainstorm pops up and ruins the party.

That’s what the lid is for. It also looks nice. 

Another reason pallets are great is that they typically measure roughly 4’x4’, and when assembled, give each compartment the ideal amount of cubic area ; large enough so that the mass of the pile helps facilitate rapid decomposition, but small enough so that the material can be turned with a hand held tool like a spading fork. 

Pallets with hooks & eyes make great removable doors for the pallet compost station design.

Want something a little more elegant? We make a cedar version with hinged gates and galvanized hardware.

If you’re handy and patient, you could probably use these photos as a guide to make your own.

Not into wood splinters, working with razor sharp metal roofing,  or looking through a three story tall pile of pallets for a dozen pallets that are the exact same size?

We can help. Pallet or Cedar.  Put your plastic compost bin at the curb with your neighbor’s leaves, and   click here to get started


Thursday
Nov082012

Field and Forest Products : The Mushroom Experts


Although Shiitake gathered off of fallen logs have been the most popular mushroom in Asia for centuries, you don’t have to pack your kimono for a 12 hour flight to Japan to enjoy this sturdy, nutritious cap. Techniques have been developed over the last several decades that have made cultivation of the Shiitake mushroom, and other strains like oyster, reishi, and maitake, reliable and productive.


Although some mushroom varieties are more difficult to grow than others, the process is essentially the same : A substrate such as hardwood logs, sawdust, wood chips, compost, or straw is inoculated (i.e. planted )with a selected variety of mushroom spawn.  Spawn is mycelial tissue of fungi which is used to propagate mushrooms.  If ideal conditions are maintained, the mushroom spawn will eventiually colonize the substrate, and after a period of time (as little as a few days to several years depending on the substrate and mushroom variety ), the first flushes of mushrooms will appear.


Interested in growing your own culinary mushrooms? Of course you can always buy one of our inoculated hardwood logs, but where do you go if you’ve got an itch harvest your own logs for cultivation? What if you want to grow something more exotic and difficult to grow, like the Maitake ( Hen of the Woods )variety?

Check out Field and Forest Products.


While there are other sources of mushroom spawn and cultivation supplies, Field and Forest is always our first choice.  They’ve been cultivating mushrooms since 1983, and they have a carefully regulated spawn lab and an adjacent farm where they can test spawn, new strains and new technologies. 


Field and Forest Products has a large selection of spawn varieties and cultivation tools for sale at fieldforest.net  . Their site also has excellent information on growing mushrooms, recipes and more.  


The how-to info on the site covers all of the common questions about growing mushrooms, like how long will it take for mushrooms to appear, how long will a log produce mushrooms, where should you store the logs, etc. They also have a how-to video library and a great selection of mushroom cultivation books  and DVD’s


Ready to take the chainsaw out to the woods and harvest some logs for your own backyard mushroom garden?  Trust Field and Forest Products .

Not into loud noises and large trees crashing down beside you?  We’ll have new hardwood logs inoculated with Shiitake, Oyster, or Reishi mushroom spawn for sale for $40/per log beginning in early December.


Thursday
Nov082012

Old Stone Patio Becomes New Organic Garden


David and Natalie Secrest’s home in Eastover has been a busy place in the past year. Teams of craftsmen added a second storey and modern amenities to their bungalow’s historic charm.  The entire landscape was recreated, and artistic blends of turf, pathways and ornamentals seamlessly wrap around the home and the outdoor living area adjacent to the guesthouse in the back.

“ We’ve really been looking forward to having an organic garden mixed into our new landscape,  and I made sure the architect saved the really sunny area behind the garage for you guys”, smiles David.

Indeed the area behind the Secrests’ Garage/Guesthouse beams with sunlight from mid morning through late afternoon, and was a perfect site for an edible garden. After reviewing some initial designs incorporating cedar raised beds, David and Natalie had a question :

Could we build the beds with the stacks and stacks of stone pieces that had been salvaged from the old patio that had been taken up?

No problem.


There were more than enough 12”x12” stone pieces to work with, and because a foot is a little wide for the side of a garden bed, we carefully broke the stone pieces in half to get a wall thickness of closer to 6”.

After a little site prep, we began setting stones in the footprint of the two long L shaped beds separated by a 4’ space where their cedar potting bench would later be placed.  This layout allowed for plenty of room to navigate between the closet storage at the back of the garage and the garden beds, which were situated right alongside the chain link fence at the back of the property.

Since a central irrigation system had just been installed for the rest of the landscape, it was fairly simple to install drip irrigation in the garden, and connect it to the main system on a new zone.


We also installed an 80 gallon rain barrel at the back of the garage so that they’ll have the ability to give their plants rainwater during dry periods.


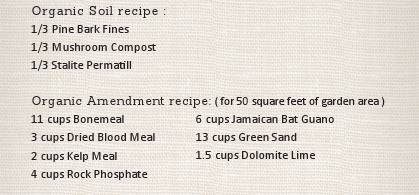
With the help of a chisel in some places, the two L shaped beds took shape, and topped out at about 12”. They were filled with our soil blend of pine bark fines, mushroom compost and PermaTill, and planted with cool season varieties including Brussels Sprouts, Broccoli, beets, carrots, kale, and sugar snap peas.


Last but not least, the potting bench that we crafted from locally cut and milled eastern red cedar timber fit in between the beds perfectly.

“We love it,” Natalie says, leaning against the bench, surveying their completed garden.

“The wildlife here is pretty persistent, though”, continues David, looking over the new seedlings a little concerned. “The neighbors’ entire vegetable garden was annihilated by rabbits and squirrels.”

“Can you guys install one of those electric fences designed to keep wildlife and pets out of the garden?”

No problem.


Thursday
Oct112012

Fall Planting Guide


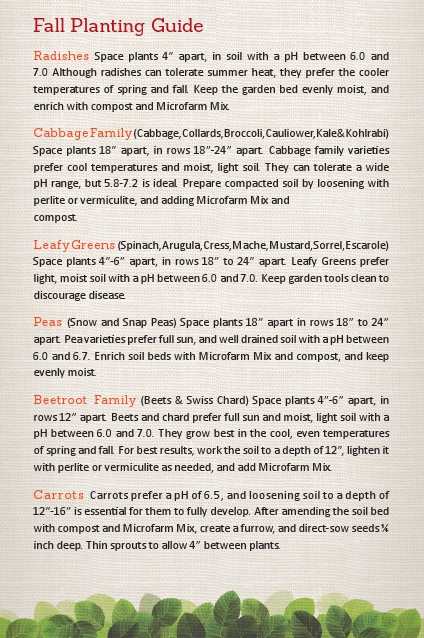
“What can you plant this time of year?” asked more than a few shoppers recently at Atherton Market. Fortunately I didn’t have to repeat the same ‘intro to fall gardening’ spiel  for six hours, and could simply point to our display rack packed with kale, collard greens, beet, Swiss chard, snap pea, spinach, and lettuce seedlings.  Once folks find out that there are lots of things to plant this time of year, then come the inevitable questions about spacing,  soil, and sunlight. Since the only information on the plain wooden plant labels we use is the handwritten name of the plant variety, here are some useful tips for growing a successful fall garden…

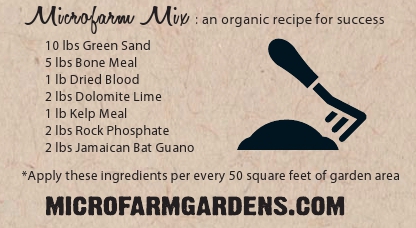
And since your garden is probably depleted of nutrients from the summer growing season, you might use this organic amendmend blend to replenish the soil before you plant...