(704) 568-8841

STAY IN TOUCH

Follow us on TwitterFollow us on FacebookFollow us on FlickrFollow us on Pinterest

Instagram

We are active on TwitterFacebook, and Flickr with gardening tips, news, and updates. Follow us and stay in touch.

Here are some photos from our Flickr account.

Search

FREE NEWSLETTER!

Get important updates, tips & tricks on edible organic gardening, micro-farming and more. 

If you aren't one for filling out forms, fret not!

You can call us at
(704) 568-8841

Or you can send us an email
hello@microfarmgardens.com

If you want to hire us for your project, need a quote, or if you have a few questions,
fill out the following and click submit. We'd love to help. 

Fill out my online form.

Tuesday
Oct242017

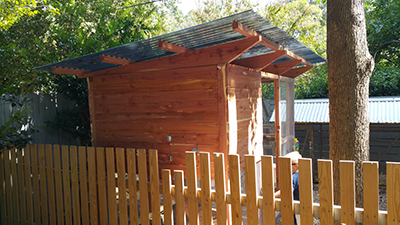
Horne Family's Garden Coop

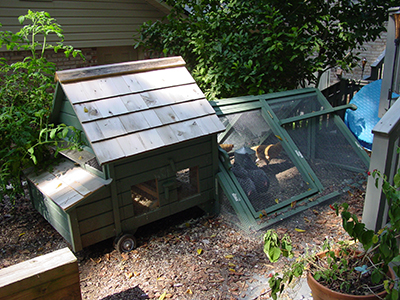
For the first few months, the Horne family’s six baby chicks looked so cute in the snug little coop that they found online.

But a year later, when it was time to close up the coop for the night, their fully grown backyard flock looked like circus clowns squeezed inside a Volkswagen Super Beetle. The small run that was added later, was built too low to the ground, and never really achieved the spacious coop environment that the family wanted to create for their hens. 


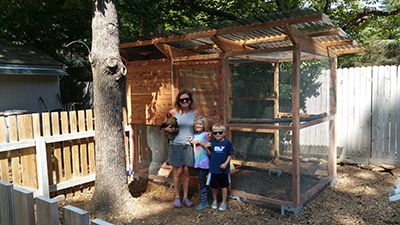
The Garden Coop design was the answer. The roomy coop is large enough for up to eight hens, and makes an even more comfortable coop for the Horne’s flock of six.

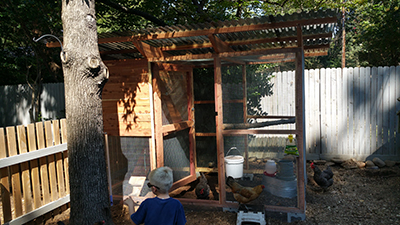
The extra space is especially helpful in giving their younger birds plenty of space apart from the sometimes moody, older hens. The outer dimensions of the Garden Coop measure about 6’x10’, and the walk-in design has excellent ventilation, and features a human entry door on the front side of the coop. 


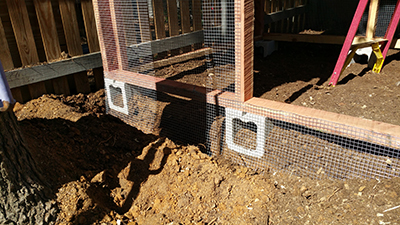
We framed the Horne Family’s Garden Coop with Eastern Red Cedar, which is naturally resistant to weather, and decay, and the roost box was also sided with red cedar. The walls of the coop were carefully  wrapped with 1/2” galvanized hardware cloth, which is buried about 12” deep around the entire perimeter of the coop, and is sturdy enough to keep out common predators like hawks and raccoons, as well as larger ones like coyotes and dogs. 


One of the best things about the Garden Coop is the fully covered run that’s built into the design. Tinted polycarbonate panels placed with a generous amount of overhang, all the way around the coop, will help keep the family’s flock cool on hot summer days, and dry and comfortable, on cold, wet, days in winter.


Horne Family's Cedar Garden Coop from Microfarm Organic Gardens on Vimeo.


Chickens love roosting on live branches, and we found the perfect hardwood branch for the outer roost that’s around 4” in diameter ;  thick enough for the hens to perch comfortably, without cramping their feet. The branch inside the roost box is slightly smaller, but placed so that all six hens can perch together inside, on cold nights. We even made the rungs on the ladder with small sections of branch, which are easier to grip, and just more fun than milled lumber or dowels. 

To make it a little easier to collect eggs, Susan requested that the egg door - which is usually placed on the front of the roost box - be placed on the left side of the coop, where it’s easy to reach without going inside the fenced area where the coop sits. And while even larger groups hens will often all use the same nest box, for the Horne Family’s backyard flock of six, we still included a partitioned double nesting box, where both sides can be reached from the single egg door.


Monday
Aug072017

Organic Remedies for Three Common Garden Diseases


Even the healthiest organic garden or greenhouse will eventually find itself under attack from common diseases like tomato late blight, blossom end rot, damping off disease, and powdery mildew. But if you take just a little time to understand these diseases, and the range of powerful, OMRI listed products available to control them, and you can put annoying garden diseases safely in the rearview mirror.


Blossom End Rot

This common syndrome affects tomato and squash plants - usually early in the season -  and is caused by a calcium deficiency that weakens fruit tissue. It can be prevented by enriching your soil with plenty of absorbable calcium, by adding dolomitic lime, and compost before planting.


A regular watering schedule helps ensure that the calcium is available to the plants. To reign in the problem, remove fruits that show signs of end rot - sunken, brown areas - and toss them in the garbage, not in your compost pile.


Powdery Mildew

Easy to spot as a white powder that forms on the leaves of squash and cucumbers, powdery mildew thrives in the humid climate of the Southeast.


You can minimize  the problem, by planting varieties that are mildew resistant, and control outbreaks of powdery mildew with a range of products, from a simple solution of baking soda, applied in the morning, to stronger OMRI listed products like Regalia, Mildew Cure, and GreenCure, and MilStop.

To fully correct the problem, remove any fruits, leaves, or even entire plants that are heavily affected, and throw them in the garbage.


Damping Off Disease

This condition thrives in cold damp areas, and is especially common in greenhouse environments. Damping Off Disease kills sprouting seeds, and also attacks the stems of small seedlings, choking off their supply of water and nutrients.

Damping off targets crushed stem tissue - often the result of rough handling of stems, when transplanting seedlings - so remember to gently handle transplants by carefully holding the leaves or root ball. You can also help eradicate Damping Off Disease, by adjusting the temperature in your grow environment, allowing seeded trays to dry a little more between waterings, and by routinely sterilizing trays and other seed starting equipment.


Monday
Aug072017

Scibelli Family's Organic Garden


Frank Scibelli opens hot new restaurant concepts like the rest of us change our socks, and his  customers are more than happy to sip drinks at the bar until a table opens up at Mama Ricottas, Midwood Smokehouse, or Bad Daddy’s.


Customers love Yafo, his newest concept, because the menu board is crowded with healthy choices, and the food is ready before you can say ‘falafel’.


So why would a busy man, who would need a jetpack to visit all of his restaurants in a single day, want to have an organic garden at home?

Fresh produce. The freshest there is. Sunshine, family time, and the tiny miracles that only gardeners get to witness.


And really really tasty Roma tomatoes, zucchini ,eggplant, and sweet Italian peppers. 


So for the garden site, we chose a tidy nook at the back corner of the house, where recent tree work had added several hours of additional sunlight each day. The family liked the simple elegance of our L-Shaped Kitchen Garden raised bed design, which fit perfectly in the area, allowing plenty of room to walk within and around the garden. To make gardening more comfortable, and help keep out rabbits, we make the Kitchen garden design about 18” tall, and add a 6” seating cap along the top edge. The Scibelli’s are a busy family, and to ensure consistent watering, we included a 1/2” drip irrigation system, that’s operated on an individual zone, at the property’s main irrigation control panel.


Our Kitchen Garden raised beds are made with untreated red cedar, and filled with an OMRI listed blend of pine bark fines, mushroom compost, and Stalite PermaTill. This soilless blend provides outstanding drainage, and contains no native topsoil, which will quickly harden and compact.

Once the garden was filled with soil and amended, our team planted an assortment of open pollinated varieties of slicing, paste, and cherry tomatoes, along with zucchini, slicing cucumber, sweet and hot peppers, basil thyme and eggplant.

So happy gardening, Frank. It’s nice to know that if you every find yourself with one too many eggplant or zucchini on hand, there’s a good chance they’ll find a home on a happy customer’s plate.


Monday
Aug072017

Greenhouse Maintenance


So you’re the kind of person who stays on top of things. Your mechanic can count on seeing your car for an oil change every three thousand miles, and at the first sign of a flake of paint on your home’s siding, there’ll be a crew with ladders and paintbrushes pulling into the driveway. You’re so fit, that In the gym, people confuse you with your personal trainer.

And you LOVE your greenhouse, but when was the last time you gave it that kind of attention, to make sure it works at its best? Not to worry, because, with these simple steps, your greenhouse will deliver optimum performance just like your other important assets.


Inspect and Clean the Greenhouse Glazing

The cleaner your greenhouse glazing is, the more sunlight will reach your plants. This is especially important during winter months, when the days are already short, and every minute of daylight counts. Remember that some glazing materials, like polycarbonate, often have a protective coating on the exterior to help prevent discoloration and damage from exposure to UV light.


The best way to clean the exterior, and minimize risk of damage to the material, is to gently scrub away dirt with a wet mop, then hose off the exterior. The inside of your greenhouse glazing may actually require more cleaning, as the warm, humid environment encourages the growth of green algae, insects, and dirt buildup. While you’re cleaning, keep an eye out for cracks, chips, or scratches, which can indicate a more serious structural problem, like a frame that racks in high winds.


Examine the Greenhouse Frame

On wood framed greenhouses, look carefully for signs of decay, especially soft spots, and areas that seem to stay wet. Rotten wood should be replaced immediately, and corroded or rusted areas on a metal framed greenhouse, should be sandblasted, and painted with a marine grade exterior primer, before applying a final topcoat. Any decayed, or corroded greenhouse benches and shelving should also be repaired. 


Inspect the Greenhouse Lighting, Heating and Ventilation Systems

Test fans, vents, windows, and doors to see that they are clean, lubricated, and all function properly. Maximize the efficiency of your heating system, by cleaning any built up soot, or debris, and wiping down heating elements. Check out motors, filters, burners, pipes, thermostats and heater ignition systems, and clean as needed, and repair any leaks in the flue.


summer is a great time to evaluate your greenhouse’s heating system, because it gives you plenty of time to order parts, and make repairs well before you’ll need to depend on the heater. Clean the filters on an evaporative cooling system, and carefully examine it for leaks. Inspect supplemental lighting for corrosion on terminals, clean lighting reflectors, and replace any florescent bulbs that show signs of discoloration at the ends.


Monday
Aug072017

5 Fun Root Varieties to Plant in Late Summer


It feels like summer is finally in full swing. You’re on a first name basis with the ice cream man, and now your teeth don’t chatter when you jump in the neighborhood pool. The electric meter spins like a pinwheel on a windy day. This time of year, root varieties like turnips and carrots may seem as out of place as an Emperor Penguin in Myrtle Beach, but in the Southeast, late summer is an ideal time to seed an assortment of colorful, and tasty root vegetable varieties that will be ready to harvest in the fall. 


Rutabaga (Swedes) Brassica napus napobrassica

Like turnips, rutabagas are cold resistant, and frequently prepared by boiling, steaming,  mashing, roasting baking, or frying. Their yellow to deep gold flesh has a rich, buttery flavor, that makes a hearty winter dish, when when mashed and served together with potatoes.The greens can be cooked like, kale, and they’re a good source of vitamin C, and believed to have the same anti-cancer qualities as turnips. ‘Gilfeather’ is an iconic, 1860’s  heirloom variety from Vermont with an exceptionally sweet root, and tender, sweet tops that are cooked as greens. ‘Laurentian’ is an excellent winter storage variety that was developed in Canada before1860.


This North American favorite, has a globe shaped, pale yellow root with a delightfully fine texture, and flavor. Direct sow in holes 1/2” deep, thin seedlings to 6” apart, in rows 12” apart. Rutabagas prefer a light, fertile soil with low nitrogen levels, and be sure to correct boron deficient soil by incorporating trace minerals.


Beet Beta Vulgaris

Until the 1800’s, beets were referred to as ‘blood turnips’, and grown mainly as a winter storage crop. Large, tapered roots were typically slow roasted to enhance their sweet flavor. The Beet has come a long way, since then, and cultivars have been developed that are sweeter, and more tender - just as tasty served hot or cold, sliced in salads, or steamed or boiled.


‘Bull’s Blood’ is a popular variety, often grown for the famously tender leaves, that are harvested long before the root develops. Sow seeds 3/4” deep, thin to 4” apart in rows 12” apart. Seeds must be kept evenly moist, and sown when extreme heat of summer has passed. unlike other root crops, beets benefit from added nitrogen. Mulch to control weeds, and keep seeds evenly moist.


Turnip Brassica rapa rapifera

One of several varieties, including broccoli raab and chinese cabbage, that were developed from an ancient cross breeding between kale and swedes. Modern cultivars have been selected for a globe shaped root, that varies from sweet, crisp flavor used in salads, to a more richer texture, cooked like potatoes in soups and stews.


Turnip greens  are high in phosphorous, calcium, and potassium, and both roots and greens are rich in vitamin C and folic acid. Sow seeds 1/4” deep, thin seedlings to 4” apart, in rows 12” apart. ‘Purple Top White Globe’ is a popular heirloom variety, developed before 1880, and the standard market and home garden cultivar. This white turnip has a purple shoulder at the top,and is best harvested when roots are about 3” in diameter.


Carrot Daucus carota

Yellow and purple carrots were first recorded in the 10th century, and since then, they've been used to make everything from syrup, jelly, and dye, to wine and liquor. For teh first few hundred years of cxultivation, carrots were purple.


Carrots grow best in light, sandy loam, that is free of rocks, and you can lighten heavy soils with peat moss or leaf mold.Remember that too much nitrogen favors top growth, and causes roots to become rough and branched, and that it's important to maintain high levels of potassium and phosphorous. Sow seeds 1/4” deep, 3 seeds per inch, thin to 2” apart, in rows 12” apart, and keep seeds evenly moist. Some growers cover newly seeded rows with burlap, or cardboard  to help keep seed rows from drying out on hot days.


‘Cosmic Purple’ is a spicy, purple skinned carrot with orange flesh, that adds a fun pop of color to salads and stir fry dishes. ‘Chantennay Red Core’ is a stocky, dark orange, French heirloom dating from the late 1800’s, that grows in heavier soils, better than other carrot varieties. 


Radish Raphanus sativus

A popular, fast growing root variety that has delighted with it’s crisp, spicy flavor for ages, radishes were given as rations, to workers building Egypt’s Great Pyramid. And, because they’re ready to harvest in as little as three weeks, radishes are especially fun for children to grow. By 500 B.C., radishes had made their way to Asia, where selection over many generations, produced larger, cold resistant cultivars, ideal for slicing and cooking in soups.


Modern favorites include the pre1885 heirloom,  ‘French Breakfast’ , and ‘Easter Egg’ - a round radish, in a colorful mix of white, red and purple. Time tested Winter storage varieties include the pre1824 heirloom, ’Black Spanish Round’, and ‘Migato Rose’. Plant salad-type radish seeds 1/2” deep, thin to 2” between plants, in rows 6” apart. For Winter storage varieties, allow 4”-6” between plants.Radishes can be planted in between rows of slower growing varieties, to maximize space and help control weed growth.