(704) 568-8841
Search

FREE NEWSLETTER!

Get important updates, tips & tricks on edible organic gardening, micro-farming and more. 

STAY IN TOUCH

Follow us on TwitterFollow us on FacebookFollow us on FlickrFollow us on Pinterest

Instagram

We are active on TwitterFacebook, and Flickr with gardening tips, news, and updates. Follow us and stay in touch.

Here are some photos from our Flickr account.

If you aren't one for filling out forms, fret not!

You can call us at
(704) 568-8841

Or you can send us an email
hello@microfarmgardens.com

If you want to hire us for your project, need a quote, or if you have a few questions,
fill out the following and click submit. We'd love to help. 

Fill out my online form.

Monday
Nov132017

Elegant Efficiency : Brenda Gaisor's Organic Garden

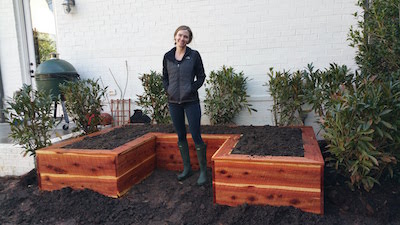
Brenda Gaisor loves being efficient, and she had long considered the organic food-growing potential of her sunny backyard, that until now, had only grown grass, and a handful of culinary herbs and tomato plants. On rainy days, she pondered how some of that water gushing from her downspouts might be collected and used to water plants instead, and had long intended to divert all those  coffee grinds, egg shells, and apple cores from the trash bin to a compost bin. She dreamed about having an organic garden like the ones in all the fine gardening magazines, and a few years ago, even bought a book on composting. Encouraged by these examples, and the firm belief that “food is thy medicine, and medicine they food”, she selected a sunny nook, tucked behind a wall alongside the house for an organic garden, compost bin and rainwater harvesting tank. 


Brenda liked the smart appearance of the 18” tall Kitchen Garden design, which features a sturdy, comfortable  seating cap. The Kitchen Garden raised bed design has two huge advantages for gardeners. One is that, being the height of a typical bench or chair seat, it makes gardening much more comfortable. The other key advantage to the 18” height, is that it makes the garden virtually inaccessible to the hungry rabbits that can lay claim to some small corner of nearly every suburban backyard.


Brenda Gaisor's Organic Garden from Microfarm Organic Gardens on Vimeo.


Our Kitchen Garden raised beds are made with untreated red cedar, which is naturally resistant to decay and insects, and once the garden beds are leveled and staked in place, they’re filled with an OMRI approved, organic soil and amendment blend. We installed Brenda’s garden in October, and planted an assortment of cool season varieties, including Marathon broccoli, Amara mustard greens, Georgia collard greens, arugula, and a mix of lettuces. In just two weeks they harvested their first salad greens!


Brenda was already sold on the idea of using a compost bin to recycle plant-based kitchen waste like coffee grinds, egg shells, and apple cores, into compost for her garden, but loved that ,with our spacious cedar compost bin design, she can add grass clippings and leaves to the list as well. Our compost bin is made with the same untreated red cedar that we use for garden beds, chicken coops, greenhouses, and other garden projects, and it has excellent air circulation, and features removable slats in front, for easy access to the compost pile. 

And while there is a spigot just a few feet away from the garden, Brenda wanted to harvest rainwater to use during the drier summer months. She selected a 200 gallon above ground rainwater storage tank, which we connected using a special diverter that allows water to bypass the tank, once it fills up. This simple method helps avoid water damage to a home’s foundation, that can happen if a rain tank overflows in a heavy rainstorm. 

Friday
Oct272017

How to Maintain Harmony in the Hen House


At around 6 weeks of age, your chickens will skirmish to establish their position in the flock’s peck order, which will regulate the flock’s social structure, and minimize stress and conflict. After the peck order has been determined, higher ranking birds use eye contact and other gestures to prevent lower ranking birds from encroaching on their space. But sometimes a nasty glare from the alpha hen isn’t enough to keep things civil in the coop, and tempers flare. Consider these tips that can help maintain harmony in your backyard flock.

-Choose a coop design with good air circulation, and plenty of space for your hens to roam. Nooks and alcoves built into the design make it easier for lower ranking birds to avoid ones that are above them in the peck order.

-Provide enough feed and water stations for your flock to prevent lower ranking birds from being chased away from a single feeder or waterer.

-If you must move your hens, avoid combining birds from different groups, as this increases stress, and peck order aggression. 

-Try not to introduce new birds into an established flock, which confuses the established peck order and can lead to aggressive behaviors targeted towards the new birds, like vent picking and feather pulling. If you do introduce a new bird, darkening the lighting in the coop will make it less conspicuous to the older birds. 

-If fighting is a problem in your flock, check to see if common stressors like poor air circulation, cramped conditions, or inadequate food supply are the reasons.

-Don’t cull a bird simply because it’s at the bottom of the peck order - remember that as long as you have more than one chicken, there will always be one at the bottom of the peck order.


Friday
Oct272017

5 Microscopic Compost Bin All Stars

The microorganisms that live and wok in your compost pile, will never complain, or call in sick. They won’t ask for a benefits package with a 401k matching plan, and dental insurance. All they ask for in return for their hard work, are your coffee grinds, grass clippings, egg shells, and banana peels. If only they had tiny little, hands - and you had time - you might try to shake a few billion of them in thanks. Instead, take a minute to learn a little bit about these unseen compost bin all stars, and give them a shout out the next time you toss in an apple core.


Bacteria

They’re the smallest living organisms, and also the most numerous in your compost pile ; they make up as much as 90% of the billions of microorganisms living in one small spoonful of compost. 


Actinomycetes

These tiny compost dwellers create the earthy smell that’s associated with soil and compost. Because of their long, branched filaments, which resemble a spider web,  Actinomycetes look similar to fungi. Their enzymes allow them to process lignin, chitin, cellulose, and proteins - making actinomycetes especially useful in breaking down woody stems, branches, bark and paper.


Fungi

These compost workhorses include aerobic molds, and yeasts, that vigorously colonize and spread new cells and filaments in the material. They process the cellulose in tough debris, allowing bacteria to complete the decomposition process, and they’re especially useful in breaking down compost because they can break down organic residues that are too acidic or nitrogen deficient for bacteria to process.


Protozoa

These are the funny looking one-celled organisms with lots of little hairs, from elementary school science class, and you can find them inside water droplets in your compost pile. Well, you probably can’t find them, but they’re there, although they play a smaller role in the compost pile than bacteria and fungi, by obtaining food from decaying organic matter in much the same way.


Rotifers

Like protozoa, these microorganisms are also found in water inside your compost pile, but rotifers are multicellular and, like protozoa, feed on organic matter and ingest bacteria and fungi.

Wednesday
Oct252017

How to Thin Seedlings


Planting your garden with rooted seedlings is ideal because the plants are rooted and strong, and it’s easy to allow for just the right amount of space between plants. 

But some varieties like carrots, beets, radishes and turnips, don’t transplant well, and grow best when they’re sown directly into the garden. And since some of the seeds won’t germinate, most direct seeding methods allow for some amount of over seeding. But most of the seeds usually do pop up, which means you’ll have way more little sprouts than you actually need, and will need to ‘thin’ them to allow the healthiest individual plants to thrive and grow to full size.


It’s especially hard for new gardeners to rip out clumps of adorable little sprouts by the handful, but without the essential step of thinning, the inevitable result will be disappointment that ‘the carrots sprouted, but never got big’. 

Timing is key with thinning ; the goal of which is to allow the seedlings to grow large enough to withstand attacks from insect pests, but not so big that they become stunted as they compete for nutrients, and sunlight.To best achieve this balance, and wind up with enough healthy seedlings after some loss to insect damage and weather, most growers thin seedlings in three successive rounds - usually about two weeks apart. 


Perform your first thinning when the seedlings are visibly crowded, and have their first true set of leaves. Make the second thinning, when the remaining seedlings have their second set of true leaves. The third and final thinning should allow for the proper amount of space between each seedling, and performed when there are three of four true sets of leaves. After the final thinning, it’s helpful to gently add mulch - like a small layer of finished compost - around any seedlings that appear stretched. This covers and helps support their fragile stems, and helps ensure that root varieties develop properly. Seedlings can also be carefully transplanted to fill gaps in the rows, where there was no germination.


Consider that thinning is essentially the process of identifying and saving the healthiest, most vigorous plants, and discarding the rest - without damaging the ones you want to keep. When 95% of an over-seeded row of carrots comes up, this can be a tricky test of patience. The standard method of thinning - simply pulling out clumps of unwanted sprouts by the roots - is fast and easy, but can damage the roots of the seedlings that you want to keep. A safer, but slower method is to carefully snip off the unwanted sprouts with scissors, just below the surface of the soil. This method is gentler on the seedlings that stay in the garden, and it yields a neat harvest of tasty, young sprouts.


Tuesday
Oct242017

Horne Family's Garden Coop

For the first few months, the Horne family’s six baby chicks looked so cute in the snug little coop that they found online.

But a year later, when it was time to close up the coop for the night, their fully grown backyard flock looked like circus clowns squeezed inside a Volkswagen Super Beetle. The small run that was added later, was built too low to the ground, and never really achieved the spacious coop environment that the family wanted to create for their hens. 


The Garden Coop design was the answer. The roomy coop is large enough for up to eight hens, and makes an even more comfortable coop for the Horne’s flock of six.

The extra space is especially helpful in giving their younger birds plenty of space apart from the sometimes moody, older hens. The outer dimensions of the Garden Coop measure about 6’x10’, and the walk-in design has excellent ventilation, and features a human entry door on the front side of the coop. 


We framed the Horne Family’s Garden Coop with Eastern Red Cedar, which is naturally resistant to weather, and decay, and the roost box was also sided with red cedar. The walls of the coop were carefully  wrapped with 1/2” galvanized hardware cloth, which is buried about 12” deep around the entire perimeter of the coop, and is sturdy enough to keep out common predators like hawks and raccoons, as well as larger ones like coyotes and dogs. 


One of the best things about the Garden Coop is the fully covered run that’s built into the design. Tinted polycarbonate panels placed with a generous amount of overhang, all the way around the coop, will help keep the family’s flock cool on hot summer days, and dry and comfortable, on cold, wet, days in winter.


Horne Family's Cedar Garden Coop from Microfarm Organic Gardens on Vimeo.


Chickens love roosting on live branches, and we found the perfect hardwood branch for the outer roost that’s around 4” in diameter ;  thick enough for the hens to perch comfortably, without cramping their feet. The branch inside the roost box is slightly smaller, but placed so that all six hens can perch together inside, on cold nights. We even made the rungs on the ladder with small sections of branch, which are easier to grip, and just more fun than milled lumber or dowels. 

To make it a little easier to collect eggs, Susan requested that the egg door - which is usually placed on the front of the roost box - be placed on the left side of the coop, where it’s easy to reach without going inside the fenced area where the coop sits. And while even larger groups hens will often all use the same nest box, for the Horne Family’s backyard flock of six, we still included a partitioned double nesting box, where both sides can be reached from the single egg door.